

Bulk Actions
Execute operations across multiple miners and track the full history of fleet actions
Overview
Managing miners one at a time doesn't scale. Bulk Actions let you execute operations - pool changes, power adjustments, firmware installs, reboots - across hundreds or thousands of miners in a single workflow. The Actions Log then gives you a complete audit trail of every operation that has run on your fleet, regardless of whether it was triggered manually, by an Automation Rule, or by Intelligent Miner. This is the page you check when you need to verify what happened, when, and to which machines.
Selecting Miners
To start a bulk action:
- Open the Miners page, on the Deployed view.
- Use the checkboxes in the leftmost column to select the miners you want to act on. Select individual miners, hold Shift to select a range, or use the header checkbox to select all of them.
- As you select miners, the Bulk Actions button shows the count of selected miners. The button is shown to users who can run bulk actions on the selected sites.
- Click Bulk Actions to open the Bulk Actions dialog, or click the arrow next to it to search for a specific action and open the dialog with that action already chosen.
You can apply filters before selecting miners to narrow down the set of machines for your bulk operation. For example, filter by firmware and model first, then select all of the results.
On the other Deployment status views (Ready to Deploy, In Repair, In Storage, Retired) you can also select miners, but only to run Edit User Data or Delete Miner on their records.
To act on a single miner, use the Actions button in the header of its Miner Details page. It offers the same actions, scoped to that one miner, while the miner is Deployed.
The Bulk Actions Dialog
The dialog shows how many miners are selected and splits the available actions into two tabs:
- Remote Commands: commands sent to the miners through their Agent, such as firmware installs, pool changes, or reboots. These go through a preview before they run, and are recorded in the Actions Log.
- Administrative: changes to Commander's own records about the miners, such as their deployment status, hosting client, or user-managed details. These are saved directly.
Building a Command Sequence
On the Remote Commands tab you build a sequence of one or more commands to run on the selected miners. Each step in the sequence is a single action.
Available Remote Commands
| Action | Description |
|---|---|
| Install LuxOS | Install LuxOS firmware on selected miners running stock firmware |
| Update LuxOS | Update LuxOS firmware on selected miners. Supports both Stable and Preview release channels |
| Uninstall Custom Firmware | Remove LuxOS or third-party firmware (such as Braiins OS or Vnish) and reboot the miners into stock firmware. Always runs as the final step |
| Sleep | Curtail miners by putting them into a low-power sleep state |
| Wake Up | Resume mining on curtailed or sleeping miners |
| Reboot | Restart the selected miners |
| Change Pool Settings | Update the mining pool stratum URL, worker name, and password for selected miners |
| Change Power Settings | Adjust the power mode or power target |
| Change Temperature Control | Set temperature targets and enable, disable, or configure Advanced Thermal Management (ATM) |
| Run LuxOS Command | Send a LuxOS API command to the selected miners |
| Blink Miner LED | Start blinking the miners' identification LED to find them on the floor, or return the LED to normal |
| Fault Recovery | Configure automatic hashboard recovery and its limits (LuxOS) |
Multi-Step Sequences
You can chain multiple actions into a single command sequence. For example, you might change pool settings and then reboot the miners to ensure the new configuration takes effect. To add additional steps, click the + button or dropdown to add another action. Each step is numbered and can be reordered or removed using the drag handle and delete controls.
Once your command sequence is configured, click Continue to proceed to the Bulk Preview step.
Administrative Actions
On the Administrative tab, pick an action from Select an administrative action, fill in its fields, and click Save. Administrative actions update Commander's records rather than sending commands to the miners, so there is no preview step.
| Action | Description |
|---|---|
| Create Ticket | Open a repair ticket for the selected miners, pre-scoped to their site and linking them as devices. All selected miners must be on the same site, up to 50 per ticket |
| Change Deployment Status | Move the miners to a new deployment status |
| Assign to Hosted Client | Associate the miners with a Hosted Client. Available to workspace admins only |
| Edit User Data | Change the miners' user-managed details, with the same value for all, a different value per miner, or a CSV |
| Delete Miner | Delete the miners' records. To retire a miner instead, use Retire on its Miner Details page (see Deleting and Restoring Miners) |
Edit User Data and Delete Miner apply only to miners you tick individually, not to a select-all selection, and require permission to edit user-managed details on the miners' sites.
Bulk Preview
Before executing any actions, Commander presents a preview of exactly what will happen. The Bulk Preview screen shows:
- Bulk Actions Summary: A numbered list of the actions in your command sequence.
- Total Miners: The number of miners that will be affected.
- Batch Size: How many miners will be processed simultaneously (default: "All at once"). This can be configured to execute in smaller batches to reduce risk or network strain.
- Delay: Time delay between batches (default: "No Delay").
Compatibility Check
Not all actions are compatible with all miners. For example, LuxOS-specific actions like ATM configuration cannot be applied to miners running stock or third-party firmware. The compatibility badges and compatibility column in the preview step helps you identify and address any issues before execution.
Executing Bulk Actions
After reviewing the preview, click Execute Bulk Actions to start the operation. Commander will process the actions according to the configured batch size and delay settings.
Actions Log
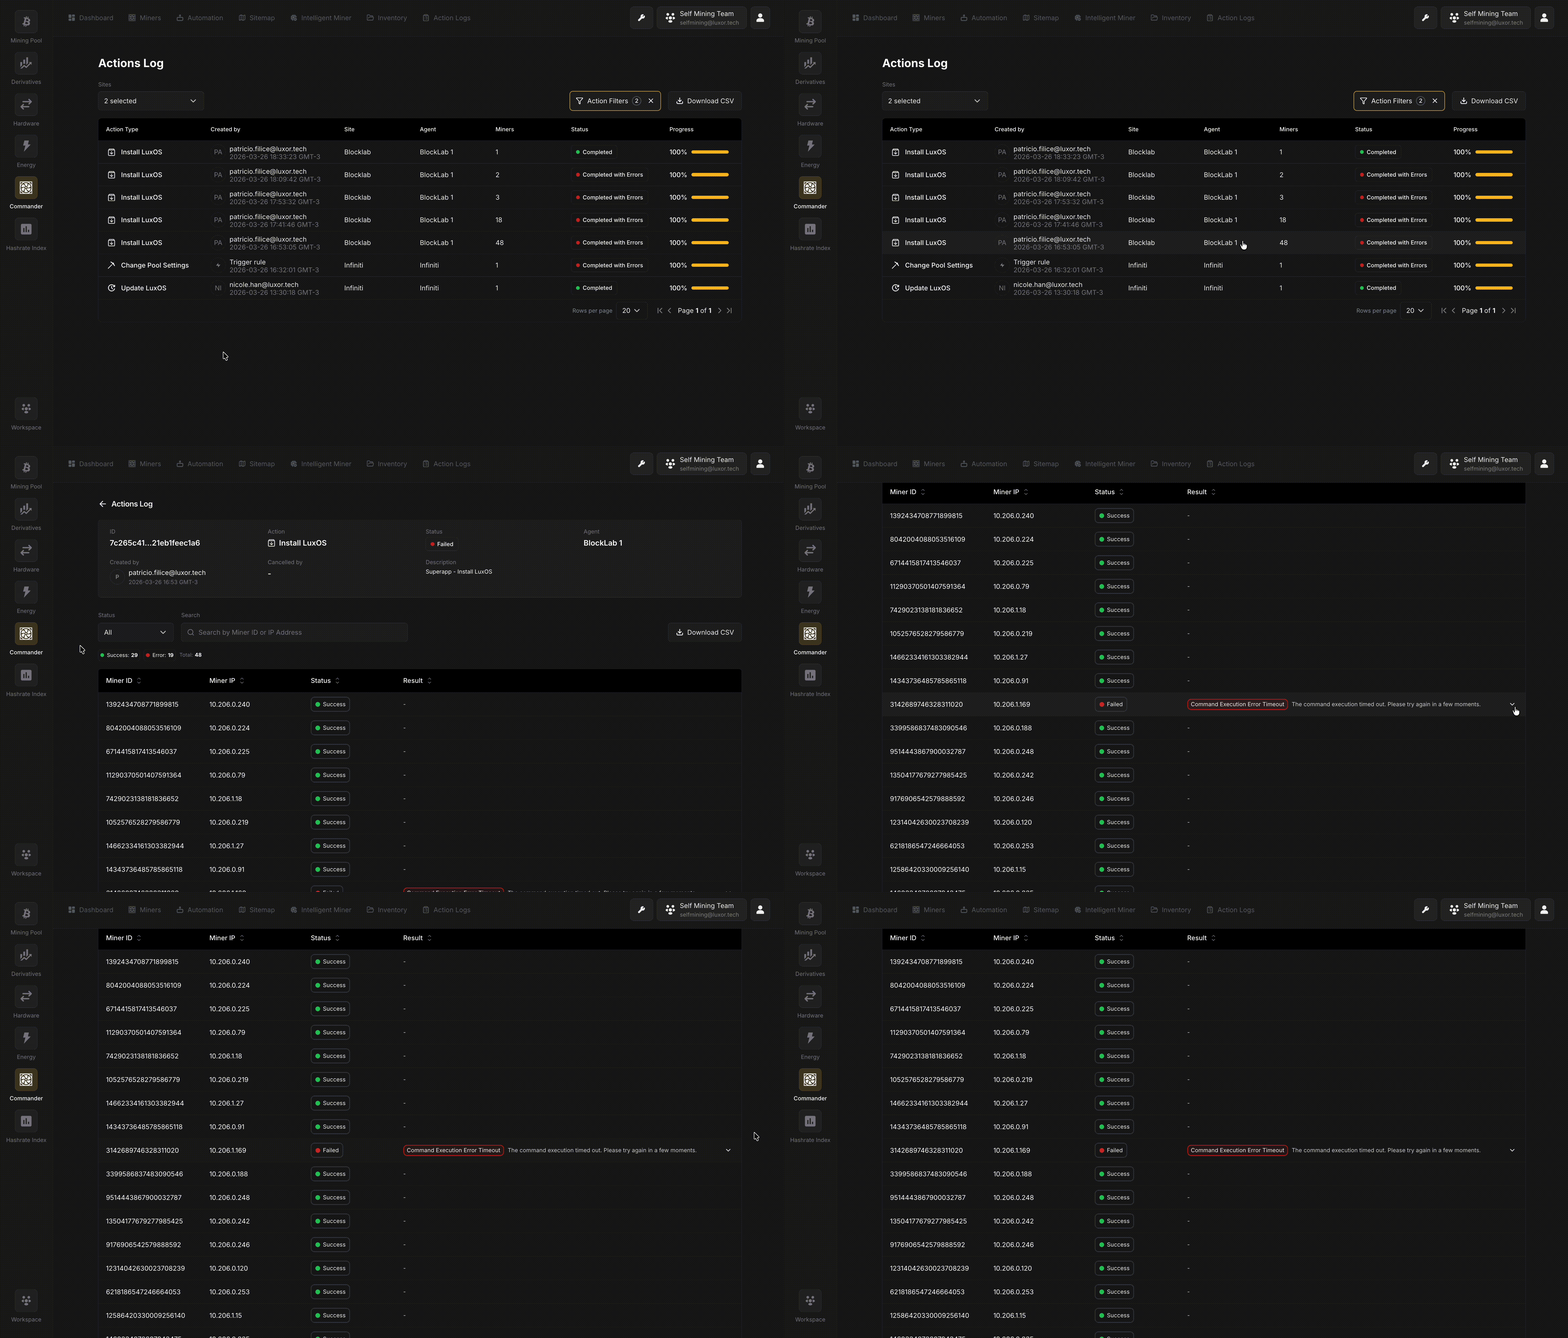
The Actions Log provides a complete audit trail of every operation executed through Commander. It is accessible in two ways: as a condensed summary at the bottom of the Dashboard, and as a full page with filtering when you click on any action entry.
Actions Table
Each row in the Actions Log represents a single operation and displays:
| Column | Description |
|---|---|
| Action Type | The operation performed - e.g., Power Configuration, Reboot |
| Created by | The source of the action: Trigger (automated rule), Intelligent Miner (system-initiated), or a user name (manual bulk action). Includes a timestamp |
| Site | The Site where the action was executed |
| Agent | The Agent that carried out the action |
| Miners | The number of miners affected |
| Status | The current state of the action: Completed, In Progress, Waiting, or Failed |
| Progress | A percentage and progress bar indicating how many miners have been processed |
Actions in a Waiting state can be cancelled by clicking the ✕ button on the right side of the row.
Action Filters
The Actions Log supports the following filters:
| Filter | Description |
|---|---|
| Sites | Filter by one or all Sites |
| Agent | Filter by a specific Agent or all Agents |
| Timeframe | Filter by a predefined time window (e.g., Last 30 days, Last 7 days) |
| Action Type | Filter by the type of action performed (e.g., Power Configuration, Reboot) |
Additional advanced filtering is available via the Action Filters button.
Understanding Action Sources
Actions in the log can originate from three distinct sources:
- Automation Rule: The action was automatically executed by an automation rule (Trigger/Schedule) when its configured conditions were met.
- Intelligent Miner: The action was initiated by Commander's intelligent automation system (Intelligent Miner), which autonomously manages miner profile adjustments to maximize fleet profit.
- User (indicated by a user icon): The action was manually initiated by a user through the Bulk Actions workflow.
Action Details
Clicking any row in the Actions Log opens the Action Details page, which provides a full breakdown of that specific operation - including its configuration, the market conditions at the time of execution (for Intelligent Miner actions), and per-miner results.
Action Summary
The top of the page displays a summary card with the following fields:
| Field | Description |
|---|---|
| ID | The unique identifier for this action |
| Action | The specific remote command executed (Reboot, Change Pool Settings, etc) |
| Status | The overall result: Success, Failed, or Completed |
| Agent | The Agent that executed the action |
| Created by | The source that initiated the action (user name, Automation Rule, or Intelligent Miner) and the timestamp of execution |
| Cancelled by | If the action was cancelled, shows who cancelled it; otherwise displays "–" |
Depending on the type of action, the summary card includes additional context-specific fields:
For Intelligent Miner actions, a Site Condition section shows the market conditions that were in effect when the optimization ran. This includes Hashprice (/MWh), and Max Load (MW). These values explain why the Intelligent Miner chose a particular profile configuration for each miner.
For Bulk Actions and Automation Rule actions, a Parameters section shows the configuration that was applied (e.g., Pool Groups, power target, or mining profile). A Description field may also appear, indicating the name of the Trigger or Schedule rule that initiated the action.
Miner Results Table
Below the summary, a detailed table lists every miner affected by the action with per-miner outcomes:
| Column | Description |
|---|---|
| Miner ID | The unique identifier of the miner |
| Miner IP | The miner's IP address |
| Status | The result for this specific miner: Success, Failed, Error, Incompatible, or Offline |
| Result | Details about the outcome - for successful Intelligent Miner actions this shows the applied configuration; for failures it shows the error type (e.g., Command Execution Error) and a message |