Luxminer CLI (Batchtool)
Luxor Firmware Client is the client built by Luxor to help you manage multiple machines at once.
Overview
This document provides detailed information on how to download, install, and use luxminer-cli, a command-line tool for managing multiple LuxOS miners at once.
Luxminer-cli is a powerful tool for miners who need to manage multiple LuxOS miners from a centralized location. With luxminer-cli, you can scan your network for miners, retrieve config and system information, and update miner configurations - all from the comfort of your command line interface.
Installation
Note: When installing luxminer-cli make sure to write the exact name of the executable in your terminal. (e.g : luxminer-cli-windows-amd64.exe)
To get started with luxminer-cli, you just need to download the tool on your local machine.
Follow the steps below to get it up and running:
- Go to the Luxor Firmware Download Center (opens in a new tab).
- Search for the Luxor Client Firmware section and Download Luxor Firmware Client drop-down button.
- Select luxminer-cli version corresponding to your platform to start the download process.
- Once downloaded, open your command line interface and navigate to the directory where you downloaded the file.
- Run the command luxminer-cli-[platform] version to certify it is working as expected (where [platform] represents the platform you selected when downloading the file, for example, luxminer-cli-darwin-amd64). If you found any issues or you need help running the luxminer-cli application, read the Running luxminer-cli section above.
- You're ready to start using luxminer-cli!
You can rename the luxminer-cli-[platform] file to luxminer-cli for shorter command line sentences.
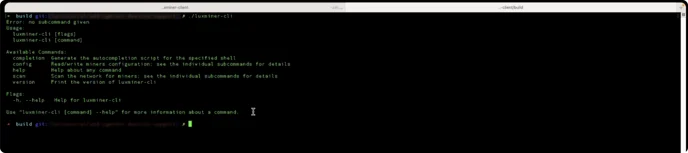
Running luxminer-cli
Note: When running luxminer-cli commands make sure to write the exact name of the executable in your terminal. (e.g : luxminer-cli-windows-amd64.exe)
Windows
- Open the Command Prompt by pressing the "Windows" key and typing "cmd" or "command prompt".
- Navigate to the directory where the luxminer-cli executable is located using the "cd" command.
- Unblock the executable file by running the command "Unblock-File .\luxminer-cli-[platform].exe" (for example, "Unblock-File .\luxminer-cli-windows-adm64.exe").
- Execute the luxminer-cli by running the command ".\luxminer-cli-[platform].exe".
MacOS
- Open the Terminal app from the "Applications/Utilities" folder.
- Navigate to the directory where the luxminer-cli executable is located using the "cd" command.
- Add execute permissions to the executable file by running the command "chmod +x luxminer-cli-[platform]" (for example "chmod +x luxminer-cli-darwin-amd64")
- Execute the luxminer-cli by running the command "./luxminer-cli-[platform]".
Linux
- Open the Terminal app by pressing the "Ctrl+Alt+T" keys.
- Navigate to the directory where the luxminer-cli executable is located using the "cd" command.
- Add execute permissions to the executable file by running the command "chmod +x luxminer-cli-[platform]" (for example "chmod +x luxminer-cli-linux-arm64")
- Execute the luxminer-cli by running the command "./luxminer-cli-[platform]".
That's it! You should now be able to execute the luxminer-cli on your operating system of choice.
Usage
luxminer-cli provides several commands that you can use to manage your LuxOS miner. The following sections provide an overview of the available commands and how to use them.
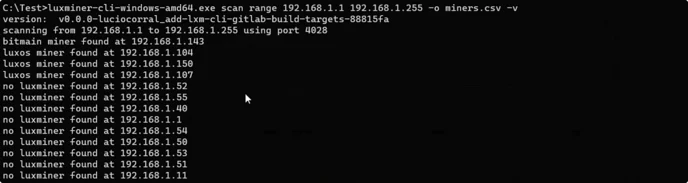
Scan network for miners
The scan range command allows you to search for miners on your network using a provided IP range. You can use IPv4 or IPv6 addresses, as well as start and end, single IP, or CIDR notations.
When executed scan range searches the network looking for miners (LuxOS or not), reads their configuration, and stores it into a CSV so you can later use it with the config read or config write commands.
Usage
luxminer-cli scan range start_ip end_ip | ip | cidr --output output_csv_file [--port port_number] [--timeout msec_timeout] [--retries n] [--max-workers n] [--only-luxminers] [--quiet] | --helpExamples
# Scan the network in the range 192.168.1.0 - 192.168.1.15, read config and save output in miners.csv file.
luxminer-cli scan range 192.168.1.0 192.168.1.15 -o miners.csv

# Scan the network in the range 192.168.1.0 - 192.168.1.15 using CIDR notation, read config and save output in miners.csv file.
luxminer-cli scan range 192.168.1.0/28 -o miners.csv

# Scan the network single miner in IP 192.168.1.10, read config and save output in miners.csv file.
luxminer-cli scan range 192.168.1.10 -o miners.csv
Options
-o, --output string      Output file to save the scan results (required)
-p, --port uint          Port number to use for the IP scan and for the miner read config process (default 4028)
-t, --timeout uint       Milliseconds timeout for each miner scan message and to use for the miner read config process (default 5000)
    --retries uint       Number of times the miner query and read process will be retried in case of error (default 2)
    --max-workers uint   Number of concurrent workers to use for the IP scan and for the miner read config process (default 100)
    --only-luxminers     Indicates whether to only scan for LuxMiner devices
-h, --help               Help for scan range command
-q, --quiet              Disable verbose output
Read miners configuration
The config read command allows you to query all the configuration information from miners in an input CSV file and save it into an output CSV file. If no output file is provided the input file will be used to output the read values.
As input, you can use the output file created by the scan command or just a simple CSV with a hostname field.
This command can be used to read all values from miners previously scanned, so that way you can have updated values without the need to re-scanning your network.

Usage
luxminer-cli config read --input input_csv_file [--output output_csv_file] [--port port_number] [--timeout msec_timeout] [--retries n] [--max-workers n] [--quiet] | --helpExamples
# Load miners listed in miners.csv file, read current configuration from the miner and store it in miners_new.csv file.
luxminer-cli config read -i miners.csv -o miners_new.csv

# Load miners listed in miners.csv file, read current configuration from the miner and store it in the same miners.csv file.
luxminer-cli config read -i miners.csv
Options
-i, --input string       Input file with luxminer list to read configuration from (required)
-o, --output string      Output file to save the configuration to; if not specified, the configuration will be saved to the input file
-p, --port uint          Port number to use for the miner connection (default 4028)
-t, --timeout uint       Milliseconds timeout for each miner message (default 5000)
    --retries uint       Number of times the read process will be retried in case of error (default 2)
    --max-workers uint   Number of concurrent workers to use for parallel miner processing (default 100)
-h, --help               Help for config read command
-q, --quiet              Disable verbose output
Update miners configuration
The config write command allows you to apply configurations and settings to multiple miners at once. You can use the CSV file generated by the scan range or config read commands as the input for the config write command.

It is important to note that luxminer-cli will compare current the configuration before applying the new one, so only updated values in the CSV file will be applied to the miner. This is to avoid writing miners that have no configuration changes, making the update process faster and safer.
You can select what kind of information to update, such as pools, wallet addresses, frequency, or voltage settings.
Below you will find the available write sections:
| Type | Description |
|---|---|
| profile | Update miners profile configuration |
| pools | Update miners groups and pools configuration |
| voltage | Update miners board voltage configuration in all hashing boards |
| frequency | Update miners board frequency configuration in all hashing boards |
If no write section is provided, profile + pools will be used as default write sections.
For example, to apply only pools config to miners:
# Load miners and config values listed in miners.csv file and apply "pools" config to the miners.
luxminer-cli config write pools -i miners.csv
Usage
luxminer-cli config write [write_section_1] [write_section_2] [write_section_n] --input input_csv_file [--output output_csv_file] [--port port_number] [--timeout msec_timeout] [--retries n] [--max-workers n] [--quiet] | --helpExamples
# Update only profile.
# Load miners and config values listed in miners.csv file and apply "profile" config to the miners.
luxminer-cli config write profile -i miners.csv

# Update only pools.
# Load miners and config values listed in miners.csv file and apply "pools" config to the miners.
luxminer-cli config write pools -i miners.csv

# Update profile and pools.
# Load miners and config values listed in miners.csv file and apply "profile + pools" config to the miners.
luxminer-cli config write -i miners.csv

# Update pools, voltage and frequency.
# Load miners and config values listed in miners.csv file and apply "pools + voltage + frequency" config to the miners.
luxminer-cli config write pools voltage frequency -i miners.csv
Options
-i, --input string Input file to read the configuration from; it must be a valid luxminer bulk configuration file obtained from the 'config read' command (required)
-p, --port uint Port number to use for the miner connection (default 4028)
-t, --timeout uint Milliseconds timeout for each miner message (default 5000)
--retries uint Number of times the write process will be retried in case of error (default 2)
--max-workers uint Number of concurrent workers to use for parallel miner processing (default 100)
-h, --help Help for config write command
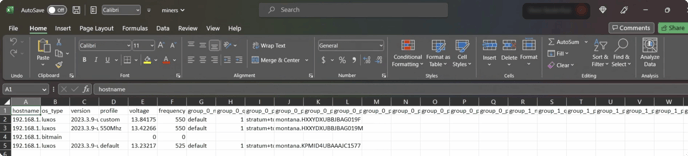
-q, --quiet Disable verbose outputUpdating CSV files
To update the CSV file generated by config read or scan range on Windows, you can open the file in Microsoft Excel, make the necessary changes, and then save the file in CSV format.
On macOS, you can use Numbers to open and edit the CSV file.
On Linux, you can use a text editor like Vim or Nano to edit the CSV file.